The Great Waistless Wonder

So pretty in theory, so tricky in execution

The Colette Jasmine pattern is a pull-over woven top cut on the bias for extra drape. It has a couple of flat collar options and some shaping in the body. It is rated as a beginner pattern, and it is.

I made up two Jasmines last spring: a wearable muslin out of blue poly, and a final version out of Liberty lawn. I don’t get as much wear out of either of them as I would have liked.

I’d never before dipped my toe into the waters of indie patterns. I knew of and had used the Big 4 for decades, but sewing was not popular when I was growing up, and all we had around was FabricLand.

When my favourite local fabric store, Needlework, opened up, they had all of these very pretty and tempting indie patterns stocked, including all of Colette’s. Of all of them, the Jasmine top showed the most potential to me: the bias cut promised a drapey, flattering fit, and it didn’t require any buttons (my sewing machine at the time was particularly good at devouring any fabric so unfortunate as to find itself underneath the buttonhole foot). It looked like a basic, fairly simple, short-sleeved shirt that had the potential to be a work wardrobe staple. Alas, it was not to be.

First, the good: the notches matched up. The collars worked. The sleeves fit pretty well. It is a garment I was able to assemble from the pattern pieces and instructions and it looked mostly like the picture on the cover. I graded between a 12 at the bust and a 10 at the waist based on the sizing chart, and then slimmed it down a bit for a closer, drapier fit.

So why don’t I wear them?

Wearable Muslin: the blue poly never pressed as well as it should have. It’s a cheap fabric I bought for testing purposes, so that’s not a real surprise. Also, because it was a test, the sizing is not quite right. The bust darts were a bit on the low side (I know, but I have the shortest back-waist measurement ever) and it all felt a little baggy.

This I fixed in the final, but the problem is that cotton lawn, even cut on the bias, doesn’t really drape.

Horrible picture! My apologies. It's been a brutally cold winter and I'm trying to spend as little time outside as possible.

Horrible picture! My apologies. It’s been a brutally cold winter and I’m trying to spend as little time outside as possible.

Cotton is one of the recommended fabrics, but on my body shape, even on the bias, it simply does not drape enough to have a flattering shape. I look like the Great Waistless Wonder from the front, where I need to have all of that excess fabric to get the shirt over my bust.

This is just not the silhouette I'm going for.

This is just not the silhouette I’m going for.

Looking at the pattern sample with the benefit of hindsight, the model is … how to put this … carrying less mammary tissue than I am, and I’m sure that’s part of why the pattern is more successful on her.

Jasmine pattern sample from the Colette site

As a result, I really only wear this shirt when I can tuck it into something. Since most of my pants and skirts don’t go all the way up to my waist (that high waist thing), this isn’t very often.

I can’t count the shirt as a success, since I get so little wear out of it (poor Liberty lawn). But I did learn something valuable from it which is, for me, that I will only wear shirts that either drape well because of the inherent nature of the fabric (like knits), or have closures. There is no point for me in making a pullover woven top, certainly not out of cotton.

Walking Away from “The Walkaway Dress”

Butterick 4790 was my third sewing project ever and the second dress I made, and I was super proud of it at the time. I picked this dress because it looked cute and easy: there are only three pattern pieces, and no zippers, lining or facings to worry about. The pattern itself is very simple and easy to assemble with clear, easy to follow instructions. I used lightweight cotton gingham, in line with my plan for a fun weekend dress and made no pattern alternations.

Two years later, I now know that the pattern, while simple, requires too many alterations to become the cute vintage dress of my dreams.

The Pattern
B4790 illi

B4790

Butterick 4790, commonly known as the “Walkaway Dress” is described as:

Three pattern pieces, bust darts in front, front and back waist darts, with a back waist seam. Fuller back skirt wraps around to the front panel for a sheath-and-overskirt look.

Apparently B4790 was the highest selling pattern ever, and when it was released in 1952, Butterick dubbed it the “walk-away” dress. It was so easy you could “Start it after breakfast…walk-away in it for luncheon!” The simple yet flattering wrap design and easy construction were what made it so popular. The dress itself is designed as a sheath-style at the front which fastens at the back with snaps, and an overlay circle skirt that loops around and fastens at the waist in front. All of the raw edges are finished with bias binding which is flipped to the outside and treated as a design feature.

The dress goes together easily – all the notches lined up, and it fit the way you would expect from the illustration on the pattern envelope.

The Three Months
I, like many others in the sewing community, fell in love with the retro shape and the claims that it would be super-fast and easy to sew.
Oh, how wrong I was on both counts. Let me step though my issues:

1. This dress is not made for hips. I have what I like to refer to as childbearing hips. Or, in less polite terms, big hips. Normally this means big skirts are perfect, but in this case, the underskirt/front panel was not wide enough to give the level of coverage needed for me to be comfortable with wearing the dress in public.

2. The way that you fasten the dress at the back is not very secure. The pattern calls for you to use snap fastenings to secure the front “underskirt” to the back. Because of how fitted the front sheath piece is, my snaps came unsnapped constantly. I ended up replacing them with hooks and eyes, which were a little more secure but still not ideal.

3. Real life involves wind. Seriously, this thing is not safe for wind – that huge skirt, the not so huge underskirt. Somehow, probably due to the front opening, it lets the wind in so much more than a normal circle skirt. This “vent” and the insufficient overlap between the over and under layers means that even the slightest wind will cause you to desperately try to hold the skirt down.

4. The weight of all that skirt dragged the bodice down at the back, resulting in uneven and awkward hems, where the front underskirt portion is much shorter than the back, like an unintentional hi-low hem.

5. All that bias binding. The pattern instructs you to finish all of the raw edges except the hem with bias binding. In most versions, including the pattern envelope, the binding sits on the outside of the dress, rather than the inside as usual. I don’t think there’s anything wrong with homemade clothes, but that stuff looks “Becky Home-Ecky” in the worst way.

6. The pattern is actually just really unflattering out of the envelope. I think that some of the changes made when the pattern was modernised and re-issued are to blame.
It is, of course totally possible to make a cute version of Butterick 4790: the Edelweiss Patterns blog has some great instructions on how to make the pattern both more vintage-appropriate and flattering. Unfortunately, it was too late for my version, which I realised was unflattering, uncomfortable and unsalvageable.

Personally, I’m just going to chalk this one up to poor judgment – I already binned the finished product after wearing it fewer than 10 times and realising how much it didn’t work for me. I’m not sure what I could have done differently at the time to make it work better. However, with the experience I now have in sewing, I realise that this pattern is not flattering on anyone without a substantial amount of work, which I don’t think is worth it when there are so many other patterns available

I’m not so shirr about this one

Back in April, when I was still new to the indie sewing scene, Sew Caroline released the Tank Dress pattern. It’s a basic sleeveless dress with shirring at the waist as its main detail. I bought the pattern the day it came out. Now, half a year after making it, I’m pretty meh about the finished dress.

The Purchase

I bought this pattern for essentially three reasons:

  1. I was in the middle of a pattern buying frenzy. The hype around indie patterns sucked me in, and I pretty much immediately bought every pattern that was released. I spent a lot of money on patterns that I will never use or have no interest in anymore.
  2. I liked the casual ease of the garment. It’s easy to wear and the style fits into my current wardrobe seamlessly. Whenever I wear a dress I get asked, “Why are you wearing a dress, what’s the special occasion, are you sick, who died?” as if I’ve never before stepped foot out of the house in anything but sweatpants. I’ll admit that I usually stick to jeans and a t-shirt, but this dress gives off the same casual vibe. As a novice dress-wearer, I also need a silhouette that minimizes the risk of wind…incidents… and this fit the bill perfectly.
  3. I can make it up in a graphic quilting cotton without sacrificing shape/drape/comfort/etc. I am really drawn to bright colors and prints, so I tend to horde geometric quilting cottons like a magpie.

The Aesthetic

I’m still really attracted to this silhouette. If I’m going to wear a dress at all, this is what I want it to look like. It’s the dress version of the Grainline Archer, one of my wardrobe staples: very casual, and as long as it’s been ironed, it makes me look like I put some effort into getting ready (spoiler alert: I put no effort into getting ready). Unlike some other strappy dresses that I lusted over all summer, this one balances the proportions of my man shoulders and doesn’t draw attention to my proclivity to slouch at all times.

The PDF

This is my first major issue with Sew Caroline’s patterns: the PDFs suck. There are only borders on 3 sides of the page. Now I know some people only like to cut the minimum necessary amount before taping and blah blah blah, but it just seems stupid not to have a clearly-defined border on all 4 sides. Some people (like me) like to cut off all 4 sides of the paper so that my patterns fold easily and aren’t full of lumps. The PDF is 36 pages long including the 11-page instructions, which isn’t that bad compared to some other PDFs, like Colette. The instructions are geared towards beginners and have plenty of color pictures and detailed explanations; nothing bad there.

The Alterations and Fit

I lengthened the pattern a couple of inches because I’m tall, but otherwise made no adjustments to this dress.

Based on the recommended size chart, I should have cut a straight XL. However, after looking at the finished measurements chart I thought there would be far too much ease in the bust and hip for my liking, so I cut a size L. In retrospect I should have graded between a L and XL at the hip, especially since it’s definitely a hair too snug after I added the pockets. The bust fits fine, and as a C cup I can usually get away without doing a FBA.

The armpits are drafted so tightly that the dress cuts into my skin and makes me feel self-conscious that I have fat armpits (J Law, call me).

In many of the testing photos, you can clearly see how little armpit breathing room there is. In the second version I made, I shaved half an inch off the front and back armpit seam. While it fits better, it’s still tight and awkward, which leads me to believe that the whole arm-hole was drafted incorrectly.

The most glaring issue is the massive poof that lives in the back above the shirring. The first time I made the dress, I was very loosey-goosey with the shirring placement and chalked up the poof to low placement. However, when I made a second version I meticulously measured where I wanted the shirring to start and end and I still ended up with floof. On the bodice, the shirring also causes weird wings under the armpits and drag lines where there previously were none, shown below. When the B-cup model has drag lines like that, it’s a pattern drafting problem.

For a fun experiment, I lengthened the Grainline Studio Tiny Pocket Tank into a dress with the same shirt-tail hem (SC’s original inspiration for the Tank Dress). While my armpits could breathe blessedly fresh air, I still had the poofing. My takeaway from this experience is that both the Tiny Pocket Tank and the Tank Dress are not drafted for shirring: but it is a design element in Sew Caroline’s pattern and should have been properly accounted for. I also think there is some obvious volume that could be taken out of the upper back pattern piece.

The shirring provides the only shaping in the pattern, but I think the addition of a bust dart would help with those pesky drag lines. Not only were they present in almost every tester’s photos, they are quite obvious in her modeled shoots. Honestly, I think she lacks the pattern making and drafting skills to properly execute her ideas. The fact that these issues were not fixed during testing says that she does not have the technical background to realize that there were fundamental issues with her product or was only interested in “testing” for publicity reasons. Or possibly, as is so popular in the indie sewing community, her testers fed her reviews full of unicorn farts and rainbows and did not address the fitting issues.

I still wear the dress as I just can’t bring myself to retire the great fabric I used to make it. I prefer the one I made from the Grainline pattern, though, as blood circulation to my fingers is generally something I strive to maintain at all times. If I’m going to pay $15 for a pattern, it needs to be impeccably drafted by a professional. I haven’t bought another Sew Caroline pattern since this one and have no plans to do so in the future.

The silk-linen sheath dress of doom … is doomed

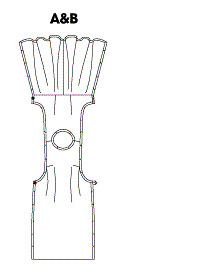
How it’s supposed to look. You’ll notice the line drawing has it fitted and without an a-line skirt–but that’s definitely not what’s in the pattern. Then again, maybe the use of drawings rather than photos should have been my first clue.

In May of this year, I posted the story of the silk-linen sheath dress of doom on my own blog. For those of you who don’t want to click over, the short version is: I decided to use the sheath dress pattern from the Built By Wendy dresses book I already had to save money (ha!), made a muslin first out of fabric that as it turns out has more give than the silk-linen the pattern was destined for, and ended up having to re-draft substantial parts of the pattern both in the muslin and in the final:

1. The raglan sleeves, which had a pile of excess fabric both front and back
2. The back, which had no shaping
3. The waist, which was too big
4. The nape of the neck, which was way too high (that could be my high-waistedness — but still)
5. And worst of all, the skirt, which for reasons known to perhaps no one but God and his left-hand man, was a-line and very loose on a sheath dress.

It is the first, last, and only time I will be using a Built By Wendy pattern. Too frustrating for words. According to the size chart on p. 33 of the book, I should be a size L at the hips and bust and a size M at the waist. But using this size–even after the modifications introduced in the muslin stage, like taking out 1.5-2″ per side on the raglan seams at the neck, front and back, adding in a big waist shaping seam at the back to take out about 2″, and taking about 8″ out of the hem in width, it was still too big. Looking back, I should have stopped using this pattern after the difficulties encountered with the muslin and found one with a more sheath-like fit and regular sleeves.

mmmay-9-3But the silk-linen was so dearly beloved that I just kept hammering away at it until I had a sheath-like sheath dress that I could wear out of the house, and then I embellished it with hand-painted and hand-embroidered fabric flowers. Success!

Three plus months later, it hasn’t worked out as well as I’d have liked.

You know how it is: you work so hard on something, and you want it to be fabulous, and in the first flush of finishedness you overlook things that become, over time, less overlookable. In the case of the dress, it was a direct result of all the modifications I made to the pattern, particularly for the raglan sleeve seams in the front. It’s almost, but not quite, flat. There is bubbling along that neckline hem. It drives me bonkers. The issue is, I’ve come to think, that the modifications to the pattern pieces for the dress and the lining were imperfectly transferred between the right and left sides of the dress, and so the lining is not quite the same length as the dress fabric, resulting in those little ripples.

I know it’s the kind of thing that your typical observer would likely not notice, but I notice it.

At any rate, at first, at least the flowers obscured most of it, right? And they were cute. But as it turns out, not washable.

So, ok, I wore the dress on a date, and I spilled something on myself, as I do, and put the dress in the wash, as one does, because I’d already pre-washed the fabric and lining so I knew it would be safe. And it was! Nothing shrunk. Except the flowers wilted up and curled in on themselves like week-old lilies.

I tried stretching, re-wetting, and pressing them. Nothing made them stretch out flower-like again. After weeks of looking at the dress hanging sadly on a hanger in the dining room (what? where do you keep your ironing?) with its shriveled little blooms staring disconsolately at me, I made the decision to snip the flowers off so I could wear the dress again.

Post-flower-removal neckline bubbling

Post-flower-removal neckline bubbling

Of course, now the neckline wavers are more visible. Argh.

I’d like to fix it, if I can. It’s silk-linen! It’s a beautiful pale yellow! It’s got such a lovely weave! It would be morally and ethically wrong to have such a fabric relegated to the wadder pile, right? Right. But how to fix it? Do I put the flowers back on? Make new flowers and find a way to attach them so they’re held partially open? Embroider on flowers instead so it’s not an issue? And what about the neckline? Should I just use some very small gathering stitches to hold it flat? I’m not sure I could open it up again to fix it even if I wanted to, it’s been sewn and unpicked and cut down and resewn so many times.

It’s not urgent; summer is gone here in Southern Ontario and I won’t be wearing the dress for another eight months, so I’ve got lots of time to figure it out.

I’ve got to say, though, the whole experience has soured me on the idea of buying and using pattern books. They look like such a good deal ($30 book nets you 10 patterns, so $3/each!), but if the patterns are no good, you’ve spent $30 on 10 patterns you can’t use, and now you’ve got a big book on your shelves to figure out what to do with. And you’ve got to go and get new patterns.

RuthlesslyPractical says:

Re, neckline: re-finish it with multiple pin-tucks to help get rid of the bubbling? It can be a subtle design element.

On vertical fit: I am noticing in the pic with the barbeque grill that the side seam around the waist area is pulling forward, so a redistribution of material from back piece to the front piece would remedy that in the next iteration of this pattern.

On bust fitting: At the risk of sounding like every other person on the PR boards, I think you need an FBA. At first, I thought it was the pose that was creating the diagonal drag lines from bust to shoulder then bust to waist, but when I looked at the first in-progress pic on your original post, on the side with the arm that’s hanging down straight, there’s a bit of telltale armhole dart wanting to happen. (I feel your pain, truly, armhole gaping is my nemesis.)

Andrea: I know! It’s an issue. I’m not advanced enough yet to know how to approach an FBA on a raglan-sleeve garment though, especially when the sleeves on their own are already an issue. Tips appreciated if anyone’s got them. 

On salvaging: If the bodice is too much trouble to modify at this stage, why not call the bodice a loss, chop it off, and turn it into a high/natural-waisted straight pencil skirt? That way, most of the silk-linen is saved, plus that shade of yellow and the fabric looks like it’s a great wardrobe basic for office wear.

LadyxBec says: 

I like this post, the only thing I suggest adding is a discussion on pattern sizing (I bet you made the correct size), like what is the difference between the size chart and what you should have sewn (if there is one), how does it fit compared to how you expect it to based on photos/line drawings, are the finished garment measurements accurate? I think that people are ALWAYS talking about how much better indies fit and how much ease the Big 4 haven which in my experience is not totally true.

Flowery Applique Camel Toe says:

I think the changes you’ve made are really good and the pictures are super helpful in illustrating your points. I will refrain from reporting you to the pressinatrix for the wrinkles, because omglinen.